Table of Contents
INTRODUCTION
Login to the Customer Self-care Interface
Password Recovery
Overview
Common Features
Action Buttons
Web Interface Tabs
Dashboard Tab
My Profile Tab
My Profile Information
IP Centex Tab
IP Centrex
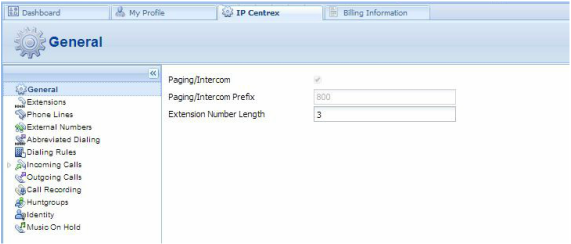
General. Paging / Intercom
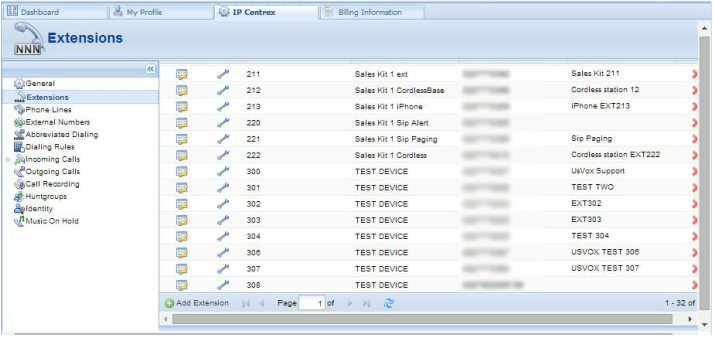
Extensions
Phone Lines
Follow-Me Forwarding Mode
Time period wizard
Advanced Forwarding Mode (Must be activated by administrator)
Simple Forwarding (Must be activated by administrator)
VM and UM Management
Voicemail
UM Preferences 'Mode'
Greetings
Voicemail Voice Menu
External E-Mail
Auto Attendant
Auto Attendant Menu List Mode
Edit Auto Attendant Menu List
Event Table
Call Queues
Abbreviated Dialing
Incoming Calls
Call Parking
Call Recording
Hunt-groups
Music on Hold
Billing Information Tab
Summary
Subscription
Lines Subscription
Transactions
INTRODUCTION
Login to the Customer Self-care Interface
UsVox Support Department will provide you with a URL and credentials for logging to the Customer self-care portal upon finalizing programming your Hosted PBX services.
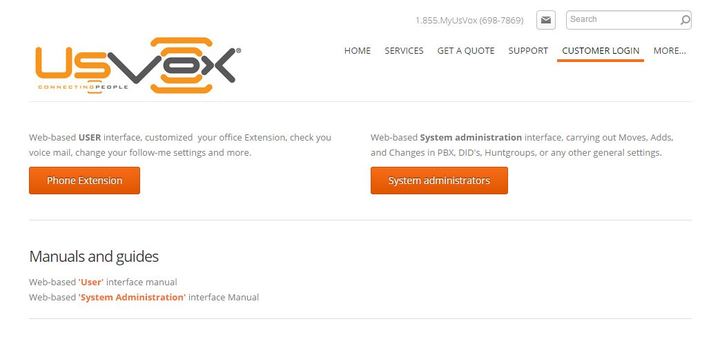
Go to our website: http://www.usvox.com/ and press the tab ‘Login’ ( http://www.usvox.com/customer-login.html )
UsVox Support Department will provide you with a URL and credentials for logging to the Customer self-care portal upon finalizing programming your Hosted PBX services.
Go to our website: http://www.usvox.com/ and press the tab ‘Login’ ( http://www.usvox.com/customer-login.html )
For Administrator Login, press the 'System administrator' button
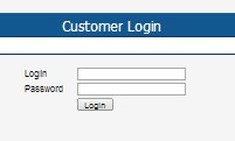
At the login page used the credentials you received from our support department
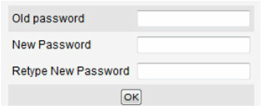
The first time the administrator logs into the system, the portal prompt to change the password.
Password Recovery
If you need to reset your password please press button you must be register to use this feature please ask you system administrator.
Overview
The Customer self-care interface was designed for end-users to access their profile data, check billing information, download invoices and, most importantly, manage their IP Centrex settings. The front-end design offers simple and intuitive navigation. This includes an easy-to-use structure of menus and controls, graphic icons and improved presentation of information.
For your convenience, the customer self-care interface is divided into four tabbed sections:
Dashboard (your home page)
My Profile
IP Centrex
Billing Information
For your convenience, the customer self-care interface is divided into four tabbed sections:
Dashboard (your home page)
My Profile
IP Centrex
Billing Information
At the top of the interface you can always view billing information such as your balance, credit limit, etc.
Common Features
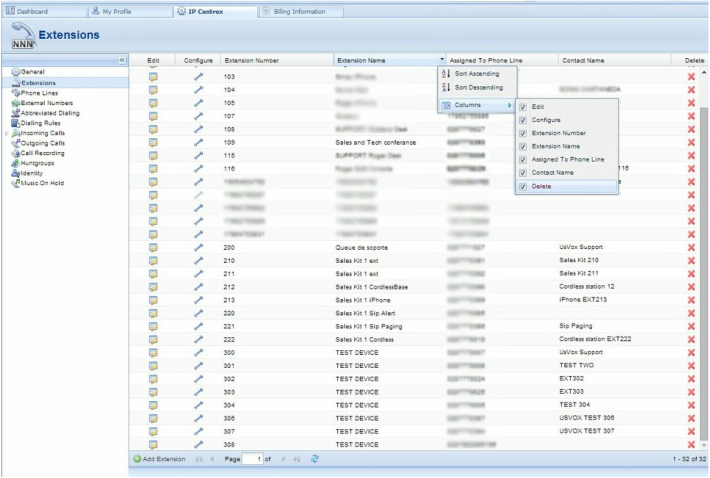
Most of the data on the self-care portal is formatted like a page and sorted into columns. You can go to the next page or the previous page, jump to the first or last page, or use the Refresh icon to update any of the pages. You can also change the number of columns and sort them in ascending or descending order by clicking your mouse on the name field of any of these columns. If you point your mouse at the name field you will see a triangle; click on it and a drop-down menu will appear. You can choose how to sort your data and add or remove columns by check-mark or uncheck-mark items in the drop-down menu:
Action Buttons
The top right hand side of the interface provides you with the following information and actions:
1. You’re ID and a login name that was used to log in.
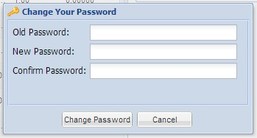
2. The Logout button that terminates your current session on the web interface. Also, you can change your password here if necessary.
2. The Logout button that terminates your current session on the web interface. Also, you can change your password here if necessary.
In order for changes to take effect when adding/editing information, you need to click the Save icon on the appropriate page. If you do not want to save the information entered – just press Cancel.
Web Interface tabs
Dashboard Tab
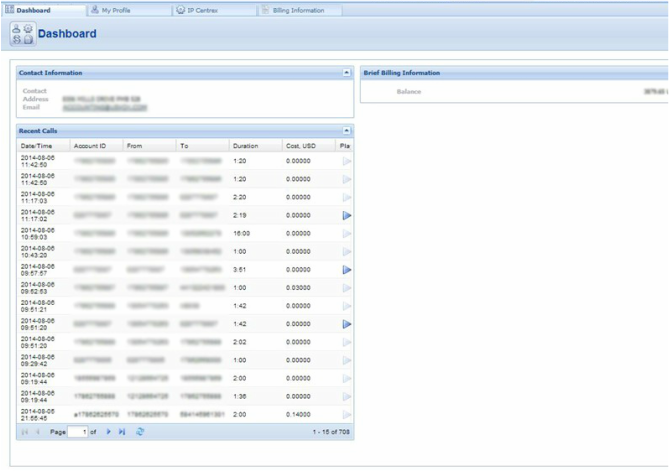
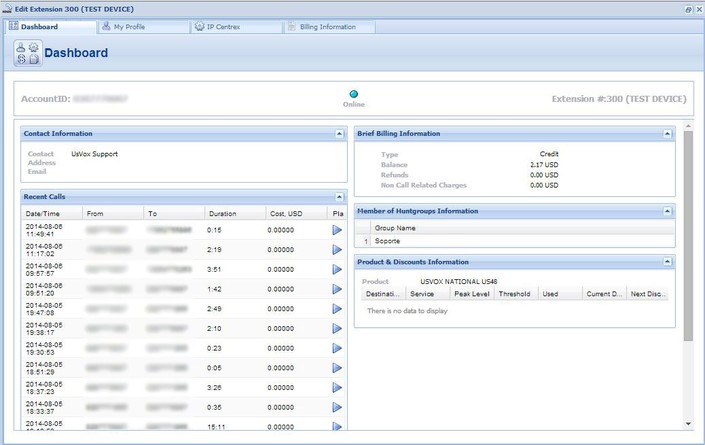
Your home page is organized like a dashboard so that you can easily view the most important information separated by category into different windows. In addition, these windows can be moved around, rearranged or minimized as you wish.
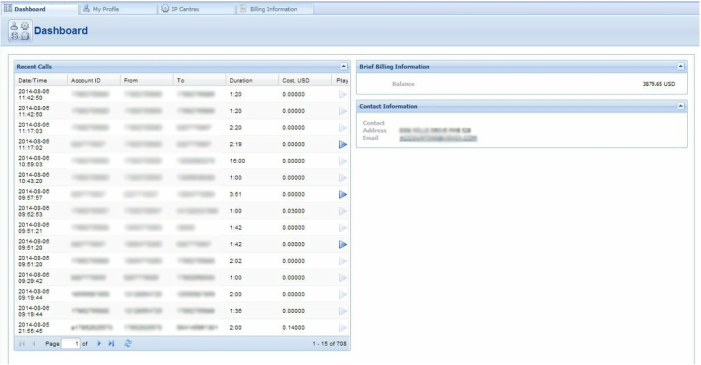
You will see three information windows on the Dashboard:
You will see three information windows on the Dashboard:
Column Description
Contact Information Here you can view your contact info such as address, email, etc.
Brief Billing Information This reflects thumbnail billing information such as your current balance and credit limit.
Recent Calls This table lists the most recent calls and call details generated by your phone lines (account IDs on the web interface).
My Profile Tab
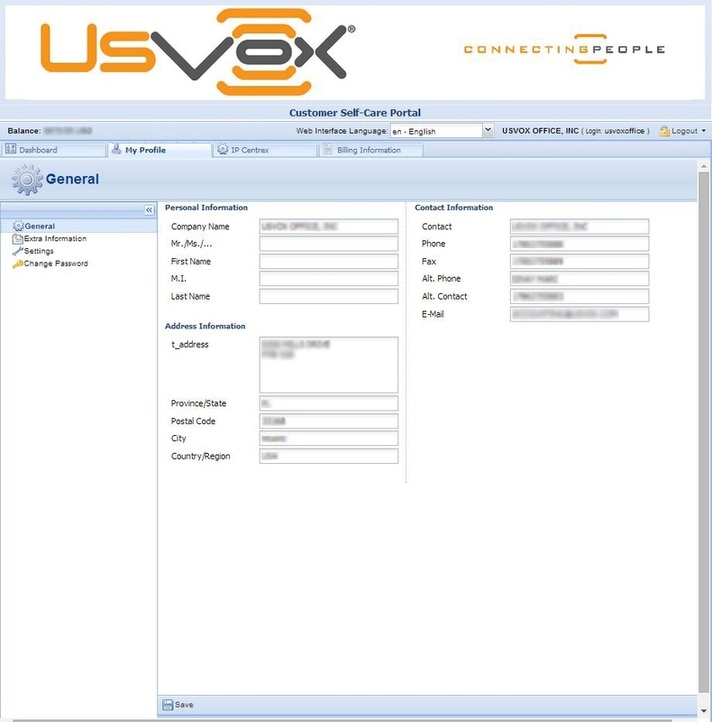
The My Profile tab allows you to view and change your personal (or your company’s) details such as contact information, personal info, password, etc.:
Tab Description
General Here you can enter general information such as company name, address, etc.
Extra Information Here you can define extra information (such as driver’s license ID or tax code) in addition to standard information. The fields for this tab are set by the Administrator.
Settings Here you can choose the language to be used on your self-care web interface.
Change Password Here you can change your current password for the self-care portal.
IP Centrex Tab
This tab allows you to manage phone lines, add extensions and hunt-groups and configure other IP Centrex services. Here you can also modify the options for separate phone lines.
General. Paging / Intercom
Field Description
Paging / Intercom Intercom calls enable users belonging to the same group to use two phones like on-door speakerphones. Here you can see whether this feature is enabled or not for your phone line.
Paging / Intercom Prefix This appears only if Paging / Intercom is enabled; this is a special code that is dialed before the other extension number to automatically connect both extensions. When a two-way audio channel is established, speakerphone mode is immediately activated on the phone of the party being called.
Extension Number Length Here you can see the number of digits for an extension number (e.g. 3, as per usual). Keep this in mind when adding extensions.
HOW THIS FEATURE WORK?
Programming example: Paging / Intercom: check mark, Paging / Intercom Prefix: 800
Dial 800 + EXT number to page intercom an extension, if the other side is on a call the page will be converted to a regular intercom call
Programming example: Paging / Intercom: check mark, Paging / Intercom Prefix: 800
Dial 800 + EXT number to page intercom an extension, if the other side is on a call the page will be converted to a regular intercom call
Extensions
Here you can define a list of extensions for phone lines within your IP Centrex environment. You can easily add new extensions or change existing ones without any actual reconfiguration of your phone.
To add a new extension number, click the Add Extension button and enter the following information:
- Extension Number – Type in the number the end-user will dial on his phone (an extension number should contain only digits).
- Extension Name – Enter the logical name for this extension (e.g. name of the person using this line: “John”).
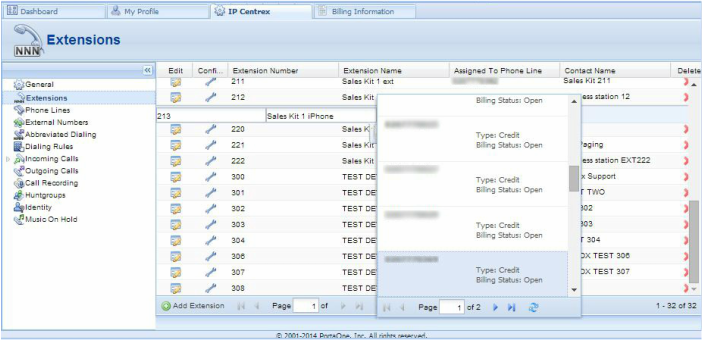
- Assigned To Phone Line (Account Number) – This is the number that the extension is associated with. Here you should specify one of your phone lines by selecting it from the drop-down list. (Note that each phone line from the list can only be used once.
Once all the information is entered, click the Update button. You can easily change the number and extension name and manage phone line assignments by simply clicking on that extension number or on the Edit icon. To remove the extension from the list, click the Delete button.
To view and edit information about the extension, press the Configure icon next to the extension number. You will see the Edit Extensions page (note that some details are read-only)
Phone Lines
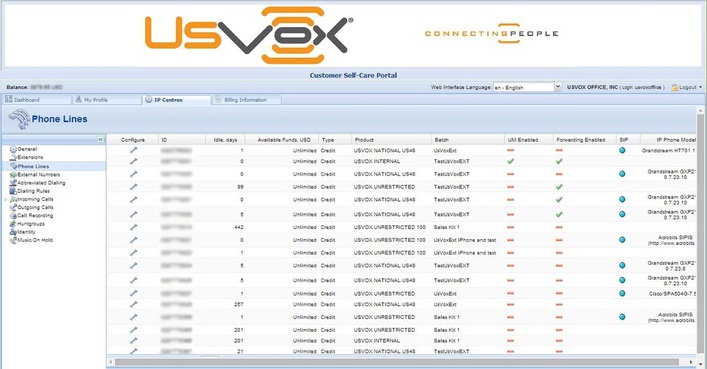
Here you can view the full list of phone lines and configure them if necessary:
Column Description
Configure Click on the Configure icon to edit the settings for a particular phone line.
ID The primary identification for this phone line.
Idle, days The amount of days the phone line has not been in use.
Available Funds The amount of funds available for the user to spend on services.
Type The type of phone line. It may either be “Debit” or “Credit.” “Credit” is usually associated with Hosted PBX EXT or DID's
Product The product assigned to a particular phone line.
Batch Batch is a group of phone lines under the same logical name. Here you can see the name of the batch that a particular phone line belongs to.
UM Enabled The UM field shows whether UM services are enabled or disabled for a particular phone line. When they are enabled, the icon is shown. The field with an icon indicates that UM services are disabled.
Forwarding Enabled The forwarding field shows whether this function is enabled or disabled for a particular phone line. When it is enabled, the icon is shown. The field with an icon indicates that forwarding is disabled.
SIP When the phone line is used by a phone to register with the SIP server, the icon is shown
You can also view phone lines grouped by batch by clicking the Group by Batch button located at the top or bottom of the page
You can configure forwarding when it is enabled for the phone line. Just click the Configure icon next to the phone line to go to the Edit Phone Line page. There are several call forwarding modes: Follow-Me, Advanced Forwarding, Forward to SIP URI and Simple Forwarding.
Follow-Me Forwarding Mode
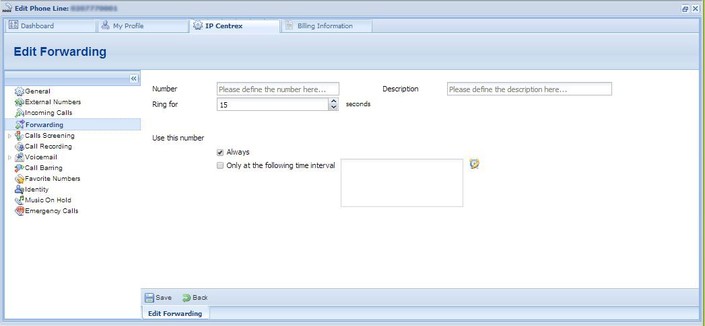
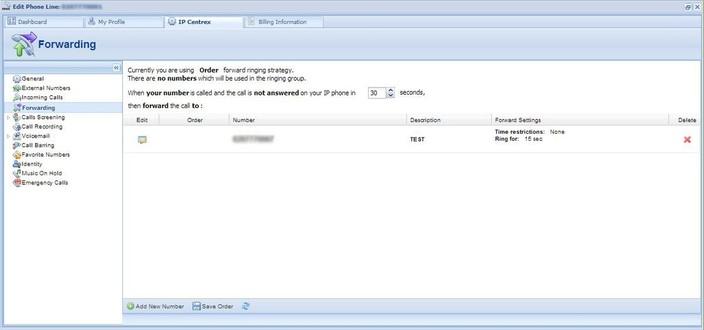
Using follow-me you can forward calls to multiple destinations. You can also configure it so that each of these destinations will be used during its own time period.
- In the IP Centrex section, choose Forwarding.
- Click + (ADD icon) Add New Number.
3. Enter the following information:
- Number – Enter a number for redirecting calls (e.g. 35644890078).
- Description – A short description for this number.
- Ring for – If a call is not answered, set the number of seconds it will ring for until it is forwarded to the next number on the list.
- Use this number – Choose the period during which the number is used. If you check the box next to Always, the call will always be forwarded to your cell phone. If you want to forward calls to a cell phone only during a specific time period, check the box next to Only at the following time interval field and click the icon to define that interval. Please consult the Time period wizard section for more information.
4. Click the Save icon to save the results of your work.
5. Repeat steps 2-4 until all the desired follow-me numbers have been added.
5. Repeat steps 2-4 until all the desired follow-me numbers have been added.
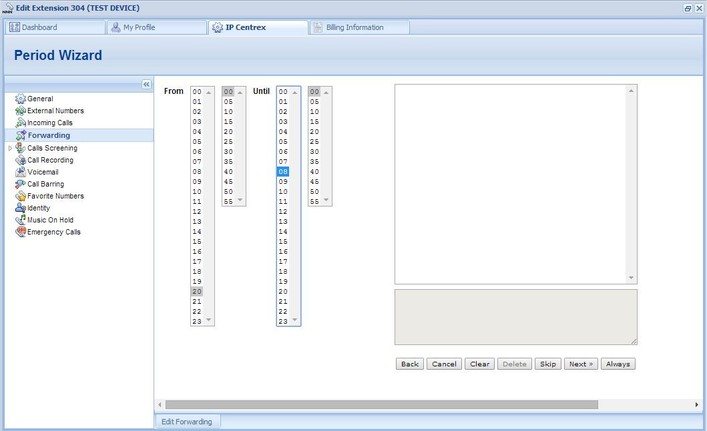
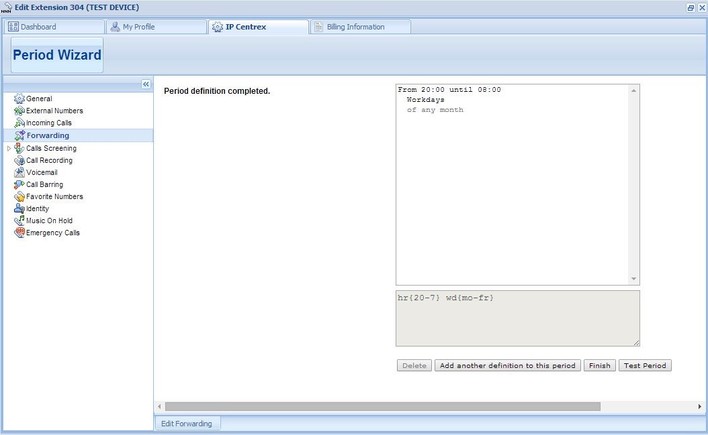
With the period definition wizard, you can easily define the time period for which a number (e.g. a follow-me number) will be used. If you want the number to be permanently active, click the Always button at the bottom of the Period Wizard page. Otherwise, define the desired period. (Times given are based on a 24-hour clock, i.e. 8pm is the same as 20:00.)
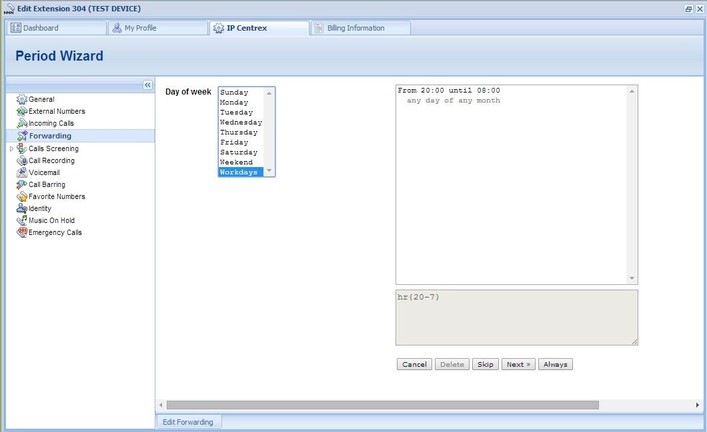
The following example illustrates the process of creating a period within the Monday-Friday workweek that starts at 8pm and lasts until 8am the next morning:
The following example illustrates the process of creating a period within the Monday-Friday workweek that starts at 8pm and lasts until 8am the next morning:
1. On the first page of the wizard, select 8pm in the ‘From’ box and 8am in the ‘Until’ box. Then click Next page.
2. Select Workdays in the Day of week box and click ‘Next’ to go to the next page.
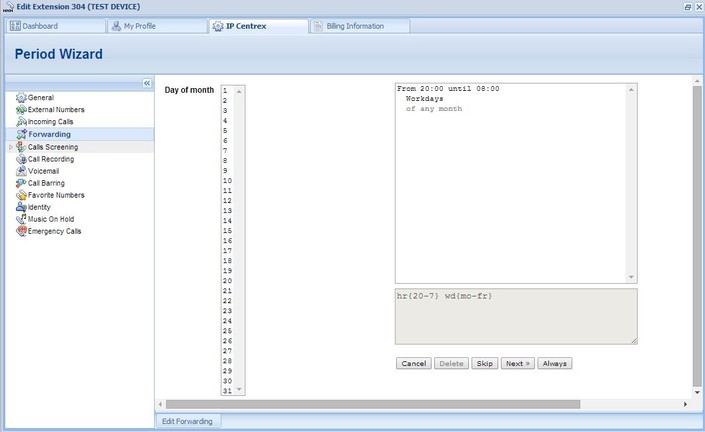
3. Click Skip on the Day of month.
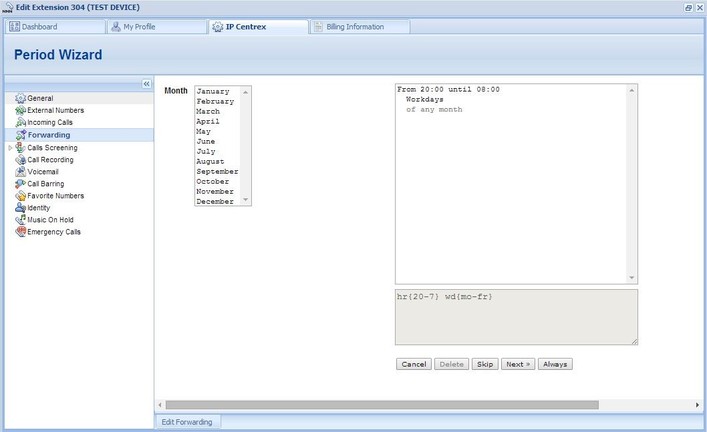
4. Click Skip on the Month.
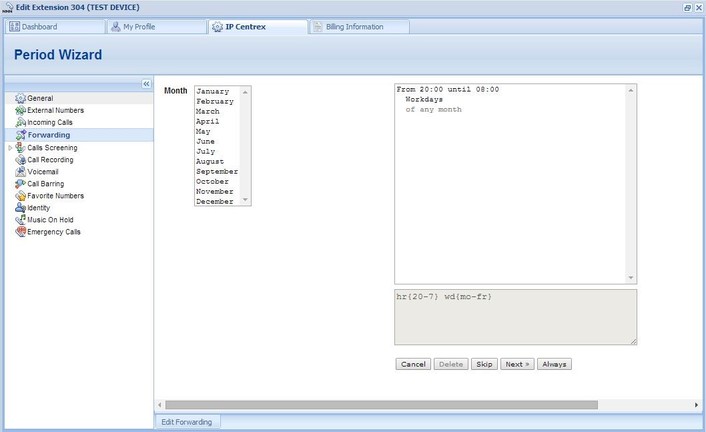
5. Click Finish to complete the period definition. If you wish to set one more definition for this period, click Add another definition to this period.
Advanced Forwarding Mode (Must be activated by UsVox Support)
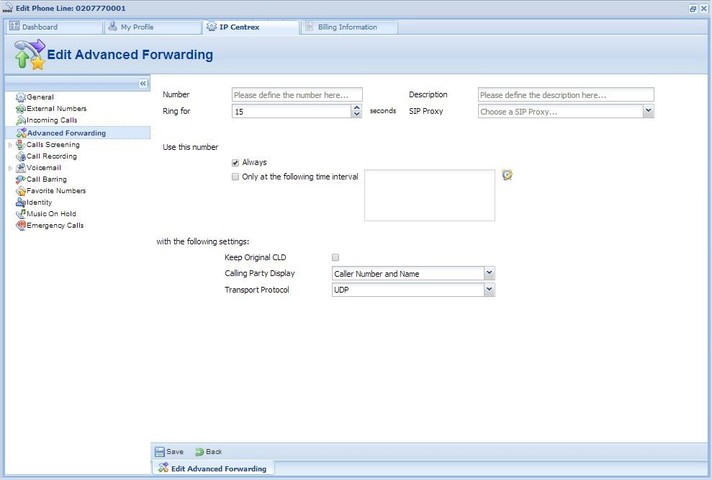
This is similar to follow-me mode, but has a few extra options that allow you to route calls to SIP URI. To do this, follow the steps below:
1. In the IP Centrex section, choose Advanced Forwarding.
2. Click Add New Number to add the number on which you wish to receive forwarded calls.
3. Enter the information needed. The fields are very similar to those for adding a follow-me number as described above.
4. Below are additional fields that are not available when adding a follow-me number.
SIP Proxy – Select SIP proxy from the drop-down menu.
· Keep Original CLD – Check this option to ensure that the originally dialed number is present in the call information when forwarding a call to another phone line.
· Calling Party Display – Choose how to display the caller’s info during forwarding:
o Select Caller Number and Name to see the phone number and the name of the original caller.
o If you choose Caller Number and Forwarder Name, then the phone number of the caller and the forwarder’s name will be displayed.
o To see the phone number and the name of the forwarder, select Forwarder Number and Name.
· Transport Protocol – This enables you to choose the UDP or TCP transport protocol. You can use the TCP protocol instead of UDP for SIP communications for PBXes that do not support UDP.
1. Click the Save icon to save the results of your work.
Simple Forwarding (Must be activated by UsVox Support)
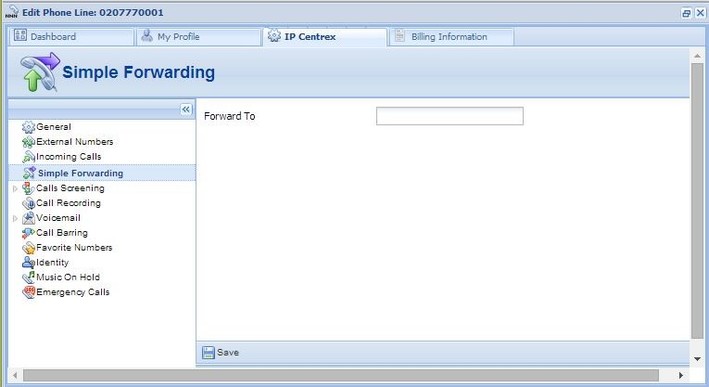
The simplest type of forwarding is when you specify a single phone number to which all calls will be sent.
1. In the IP Centrex section, choose Simple Forwarding.
2. Enter the following information:
· Forward To – The number you wish the calls to be forwarded to.
1. In the IP Centrex section, choose Simple Forwarding.
2. Enter the following information:
· Forward To – The number you wish the calls to be forwarded to.
1. Click the Save icon.
VM and UM Management
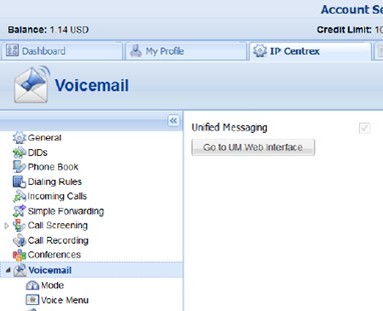
In this section you will see two screen shots ‘Right’ is the old web interface, ‘Left’ will be the new web interface
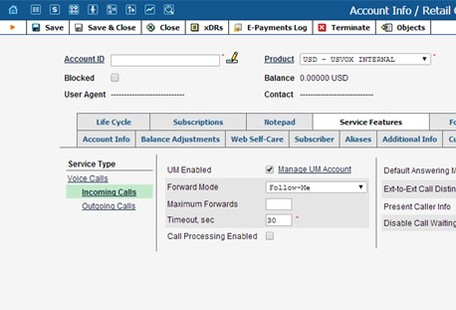
Press the ‘Manage UM Account’ when old web interface is use or ‘Go to UM Web Interface’ button when the new web interface is used
Press the ‘Manage UM Account’ when old web interface is use or ‘Go to UM Web Interface’ button when the new web interface is used
UM Preferences
UsVox UM also offers you a number of special options for accessing your email via phone.
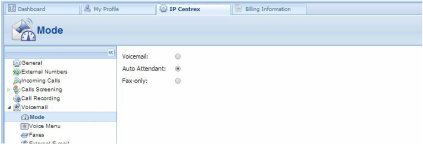
Mode
You can choose between three basic UM options: Voicemail, Auto Attendant or Fax-only
Auto Attendant (AA) UsVox UM Auto Attendant is a flexible utility designed to greet callers and transfer them either to an existing UsVox Switch accounts, or to your current phone system. Please read more under the Auto Attended section
FAX Only (Available ‘additional charges may apply. Please contact your UsVox sales representative.) In addition to voice messages, UM-enabled SIP accounts will be able to receive faxes on their “answering machine”. When a call is connected to the Voice mail and the remote party initiates a fax transmission, automatically detects this event and switches into fax receiving mode. The fax will be processed and then delivered to the user’s mailbox as a .PDF or .TIFF document attached to an email message. (For this feature to work the External E-Mail must be program and DID need to have T.38 codec
FAX Only (Available ‘additional charges may apply. Please contact your UsVox sales representative.) In addition to voice messages, UM-enabled SIP accounts will be able to receive faxes on their “answering machine”. When a call is connected to the Voice mail and the remote party initiates a fax transmission, automatically detects this event and switches into fax receiving mode. The fax will be processed and then delivered to the user’s mailbox as a .PDF or .TIFF document attached to an email message. (For this feature to work the External E-Mail must be program and DID need to have T.38 codec
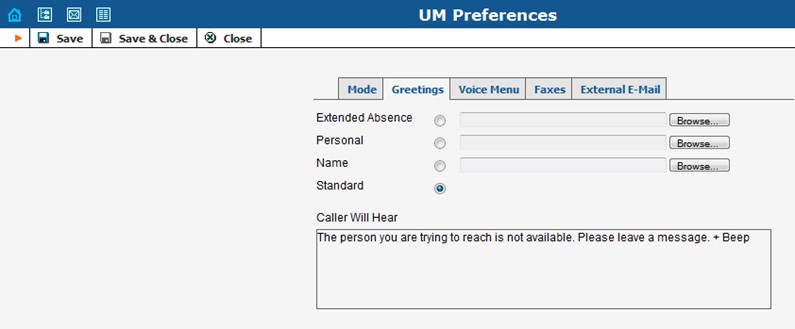
Greetings
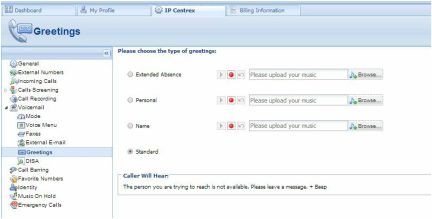
Using the Voice Menu tab, you can record, play back, and change the type of greeting message callers will hear when you are not available, choose between Extended Absence for a message providing your full name and number, Standard: for a message giving your name only or Personal for a message of your own choice.
You can either upload an existing sound file using the Browse buttons on the right, or record a new one with a microphone attached to your computer. A green play button next to the message type indicates that a sound file already exists, while a red play button means that none is currently available.
To record a message, click the red record button. When you click record, all other buttons are disabled. Alternatively, you can use the radio buttons to choose and then record a given message type.
A blinking play button indicates that a message has been successfully recorded. To save the recorded message, click Save in the action panel above. To re-record a message, click the undo button next to the record button.
Two buttons are active when playing back messages: play and pause.
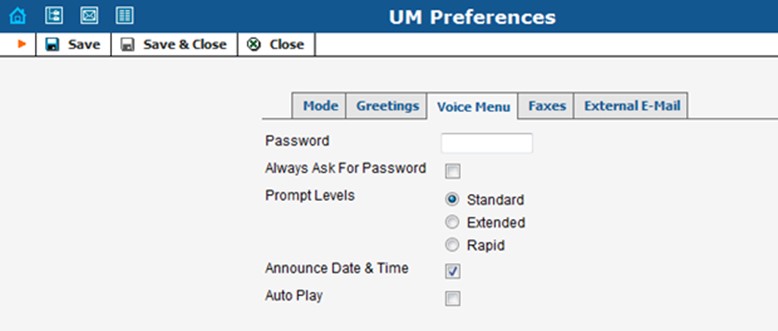
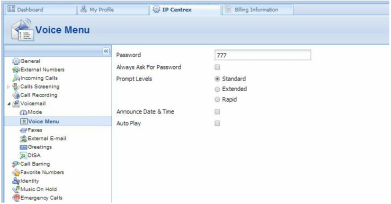
Voicemail Voice Menu
Maintain the account as a regular voicemail box for a SIP phone device.
· PIN (Password) you can change the PIN you use to access your mailbox via phone.
· Always ask for PIN in some cases, the system may recognize you when you call from your home number, and will not request your PIN (ask your system administrator if this feature is supported). If you want to be asked for your PIN anyway, check this box.
· Prompt levels UsVox UM offers three voice prompt settings in each supported language: Standard, Extended, and Rapid. When entering an account number, the voice prompt for each setting is as follows:
Standard: "Please enter your account"
Extended: "Please enter your account number and press pound"
Rapid: "Account"
· Announce Date & Time You can switch this function on or off.
· Auto Play You can have new messages played automatically by checking this box.
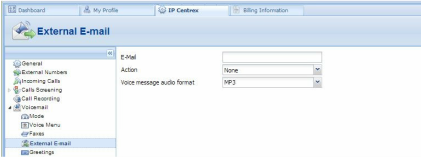
External E-Mail:
This will send voice mail to a specific email account.
Auto Attendant
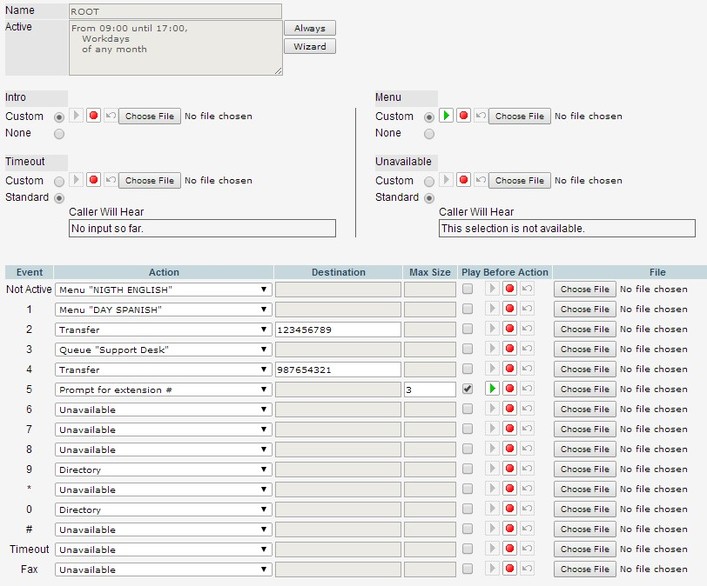
Basic Concept: UsVox UM’s auto attendant is composed of a set of menus, All the menus are identical in every respect, except for the ROOT menu, which is always present and cannot be deleted, and whose name cannot be changed.
When a caller dials the system, auto attendant will answer (connect) the call and proceed to the ROOT menu.
If a user tries to access a menu which is not currently active, the action specified in the Not Active configuration parameter will be performed; for instance, the user may be automatically forwarded to an “after hours” menu.
The Intro prompt (e.g. “Welcome to ABC Company!”) is played when a user enters a menu for the first time.
After this, the Menu prompt will be played, listing all the available options (e.g. “Press 1 for sales, press 2 for technical support”), and auto attendant will collect the digits dialed by the user on his phone touchpad.
If no input is received (timeout), the Default prompt is played and the dialog reverts to the previous step (i.e. plays the Menu prompt and collects the user’s input).
The user’s input will be matched with the corresponding menu items, and the action associated with this item will be performed. The following actions are possible:
- Default – Plays the Default prompt from the current menu and returns to the “Play Menu prompt” step (this is the action used for all menu items where the initial value has not been modified).
- Transfer – Transfers the call to a given telephone number or extension. The phone number should be entered in the same format as the customer would use to dial it from an IP phone in his IP Centrex environment; for example, to transfer a call to extension 123, simply enter 123.
- Transfer to E.164 Number – Transfers the call to a given number. The number should be specified in E.164 format: the country code, followed by the area code, and then the number (e.g. 16045551234 for Canada).
- Transfer to Extension– Transfers the call to an extension number entered by the caller from his phone. (Callers can direct dial to an Extension any time during the menu greeting) To prevent abuse (e.g. someone attempting to enter a long-distance number in this way), you can specify the maximum allowed number of digits in an extension (Max Size). Use the abbreviated dialing quantity of number of digits, if you are using 100, 101, and 102 and so on, specify the maximum allowed to: 3
- Transfer to Voicemail – Switches to voicemail mode. This should be designated as an action for the “Fax” event, in order to allow storage of received faxes. Also used the ‘UM Preferences’, External E-Mail with forward, this will send voice mail to a specific email account.
- Menu – Transfers the user to the selected menu.
- Directory – Launches this company’s dial-by-name directory.
- Queue – Transfers the call to the specified call queue.
Auto Attendant Menu List Mode
Auto attendant can be selected from the Options menu. The main screen lists all the menus available in the system.
To modify one of the existing menus, select its name from the list, to add a new menu, select ‘Add’ from the action panel.
To modify one of the existing menus, select its name from the list, to add a new menu, select ‘Add’ from the action panel.
Edit Auto Attendant Menu List
After selecting one of the existing menus, please allow all the prompts to load in your browser; this may be viewed on the status indicator in the action pane.
The fields of the Menu Edit screen are explained below:
The fields of the Menu Edit screen are explained below:
|
Record. Select to start recording your voice prompt. (You will need to connect a microphone to your computer’s sound card to use this feature.) After the existing prompt has been recorded over, the Undo icon becomes available, allowing rollback to the previous state. The blinking Play icon indicates that the existing prompt is being overwritten, but changes have not been saved yet.
|
Each of the icons above may appear in grayscale, meaning it cannot be accessed because some other task is active.
The native audio file format for the system are the following Type: NeXT/Sun (Java) file .au, Format: G.711 u-Law, Attributes: 8,000 Hz, 8-bit, Mono
UsVox UM uses SOX - Sound eXchange, a universal sound sample translator for prompts uploaded into native UM format. Here is a short list of supported audio file formats. Here is a short list of supported audio file formats:
File Type Description
.aiff AIFF files used on Apple IIc/IIgs and SGI.
.au SUN Microsystems AU files.
.gsm GSM 06.10 Lossy Speech Compression
.mp3 MP3 Compressed Audio
.ogg Ogg Vorbis Compressed Audio.
.raw Raw files (no header).
.wav Microsoft .WAV RIFF files.
Event Table Description
Event Not Active – When the current menu is not active (see the active period definition above).
0-9, #, * – User selection on telephone keypad.
Timeout – No selection received from user.
Fax Fax CNG tone detected.
Action See the description of available actions in the Basic Concept section above.
Play before action Check this box if the corresponding prompt is to be played before an action is performed.
File File name and path for the prompt file.
Call Queues
- Destination – A Hunt-group, Extension Account or phone number where an outgoing call may be forwarded to. The fact that this is a single number does not, of course, mean that you can only have one agent answering calls. This is simply the number used to forward calls to.
- Max Connected Calls – This defines the “bottleneck” of your queue (i.e. the maximum number of concurrently connected outgoing calls).
- Call Duration – The average expected processing time for each call (used to calculate the estimated waiting time).
- Music on Hold – A melody (or announcement) which is played to users waiting to be connected.
Each call queue contains a pool of incoming calls (users trying to get connected) and a number of connected outgoing calls (calls that have already been connected to agents). When a new incoming call arrives, it is assigned a position in the queue.
The caller will hear an announcement about his position in the queue and the estimated waiting time, which is calculated as (average call duration) / (maximum number of connected calls) * (total number of users before him in the queue). After that, the specified “music on hold” is played, and every minute the caller is updated as to his current position in the queue and the estimated waiting time.
If there are callers on hold and the number of connected outgoing calls is lower than the specified threshold, system will attempt to connect the first person in the queue. If the call is not connected on the first attempt (some representatives may not be available at the moment) the system will make another attempt, then another one, and so on. This will continue until either all of the incoming calls are connected. In the latter case, the system will simply wait until one of the agents finishes serving his current customer, thereby disconnecting one call and making “room” for a new outgoing call.
Abbreviated Dialing
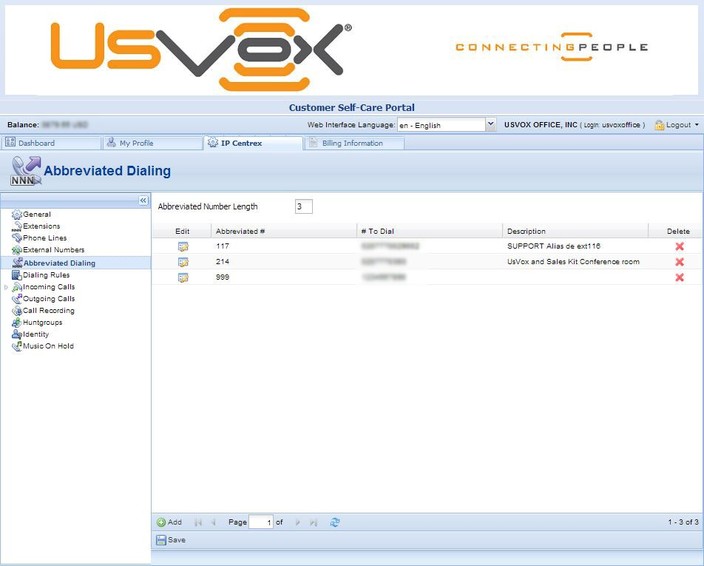
Here you may define a list of abbreviated dialing for external phone numbers.
To add a new abbreviated dialing number, click the Add (PICTURE) button and enter the following information:
Field Description
Abbreviated # The number the end-user will dial on his phone (extension number).
# to Dial The number that the call will be forwarded to. You may enter the ID of one of your accounts or any phone number. If you leave this field blank, then the abbreviated number is considered to be a direct number, or “dial as is.” This is useful for making sure that special numbers (e.g. 112) are never converted by other translation rules.
Note: Phone numbers must be entered in the E.164 format.
Description Description of this abbreviated number, e.g. “Andrew’s IP phone.”
Incoming Calls
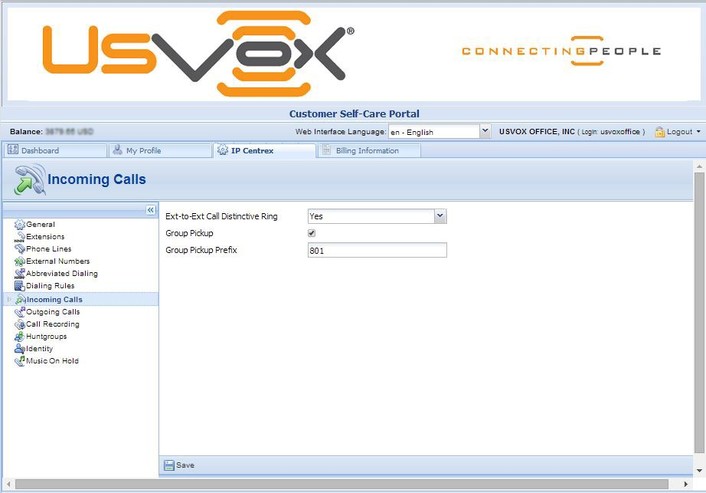
Here you can set the parameters for incoming calls:
Column Description
Ext-to-ext call distinctive ring For incoming calls from phones within the IP Centrex environment, use a ring pattern different from the default one.
Group Pickup Enable the Group Pickup feature, which enables phones within the same IP Centrex environment to answer each other’s calls by dialing a Group Pickup Prefix.
Group Pickup Prefix This is only available if Group Pickup is activated. Specify the special code for picking up calls here.
Call Parking
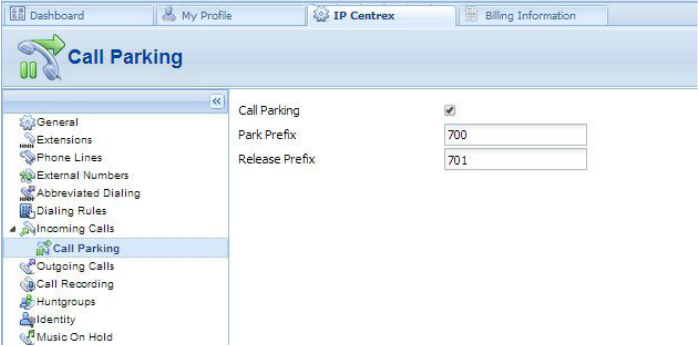
Call parking allows users to put a conversation on hold and then resume it from a different IP phone. If you enable this feature, you can set the required parameters for it here.
Column Description
Call Parking Enables the Call Parking feature.
Park Prefix This is only available if Call Parking is activated; this allows you to specify a key combination for parking a call.
Release Prefix This is only available if Call Parking is activated; this allows you to specify a code in order to quit the call parking status and resume the conversation.
HOW THIS FEATURE WORK?
Programming example: Park Prefix 700, Release Prefix 701
During a call transfer the call to 700 and a parking space, example: transfer the call to 70010, any one on your Hosted PBX can Release the call (Un-Park) by dialing 701 and the parking space Example: 70110
Call Recording (Available ‘additional charges may apply. Please contact your UsVox sales representative.)
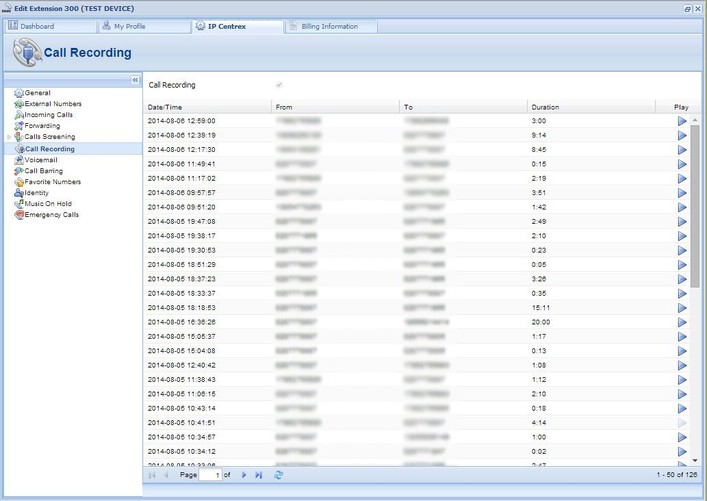
With the help of this feature, the users of IP Centrex services can record their phone conversations for later playback.
Here you can check whether the Call Recording feature is enabled or not. When it is enabled, you can view information about calls and listen to recordings.
‘Picture show from Extension/Call Recording’
Here you can check whether the Call Recording feature is enabled or not. When it is enabled, you can view information about calls and listen to recordings.
‘Picture show from Extension/Call Recording’
Hunt-groups
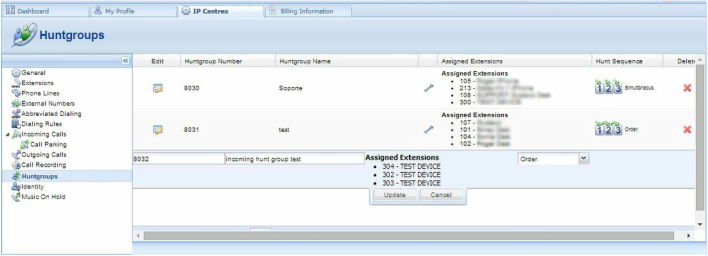
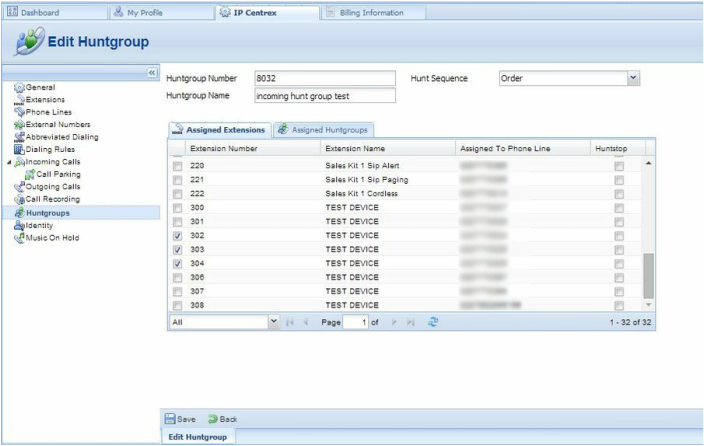
Sometimes there is a need for a call to be delivered to several extensions at once. With the Hunt-group function – you can easily configure a scheme for call distribution in such a way that incoming calls are delivered to one or more assigned extensions.
· Hunt-group Number – The number the end-user must dial on his phone to reach one or more assigned extensions.
· Hunt-group Name – Logical name for this group of extensions, e.g. “New department.”
· Hunt Sequence – Specifies the order for delivering a call to one or more extensions.
· Hunt-group Name – Logical name for this group of extensions, e.g. “New department.”
· Hunt Sequence – Specifies the order for delivering a call to one or more extensions.
- If Order is chosen, extensions will be called one by one from the first (topmost) to the last number until the call is answered.
- Choose Random if you want to use a random order.
- Simultaneous enables simultaneous calls to every extension from the list.
- If you choose Least Used: This sorts the phone lines in descending order beginning with their last usage, and delivers a call to their extensions, accordingly. (For example, phone line 777111 with extension 111 was last used on 2010-12-11, and phone line 777222 with extension 222 was last used on 2010-12-12, so the call goes to extension 111 and if it is not answered, it goes to extension 222.)
|
In order for changes to take effect you need to click the Save icon at the bottom of the page; you can also use the Back button to return to the previous menu.
Several hunt-groups can be combined into one hunt-group. Go to the window for selecting extensions, choose the Assigned Hunt-groups tab and check the boxes next to the desired groups. Then click Save. |
NOTE: Extension and Hunt-group numbers must be different.
Music on Hold
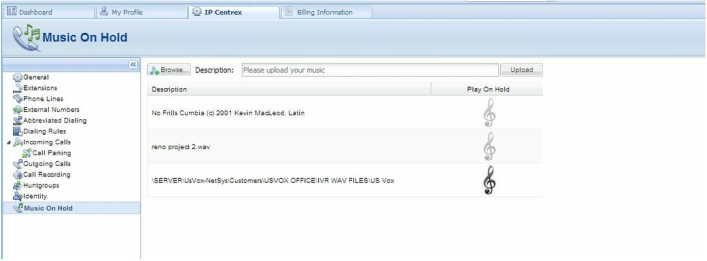
Here you can define which music will be used for calls on hold within your IP Centrex environment.
To rename the music file, enter the desired name in the Music Name field; otherwise the local file name will be used. The uploaded music will replace the previous entry in the list, and will usually be enabled within 10 minutes of performing this action
BILLING INFORMATION TAB
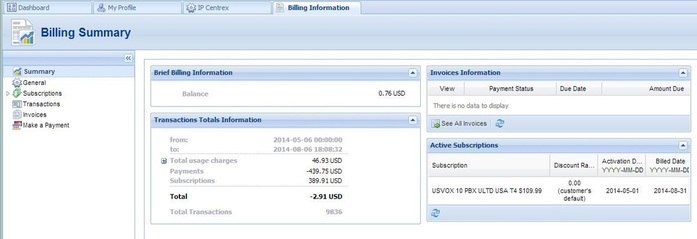
Summary On this page you can view your billing information arranged in four information windows:
- Brief Billing Information
- Transactions Totals Information
- Invoices Information
- Active Subscriptions
Brief Billing Information This reflects your billing info such as current balance, etc.
Transactions Totals Information This reflects your total transactions (calls, payments, refunds, subscription charges, etc.)
Invoices Information This displays information for your most recent invoice along with its status (due / unpaid). To view all of the invoices use the See All Invoices button. You can also view the amounts due for the present day and make payments at the same time.
Active Subscriptions Subscription plans that currently apply to you.
Subscription
This tab displays the subscription plans currently being applied to you.
Subscription Subscription plans being applied to you.
Discount Rate, % Amount of discount being applied for this subscription.
Start Date Subscription activation date.
Activation Date This displays the date on which the subscription was activated.
Finish Date This shows the date on which this subscription will be automatically canceled.
Billed Date This shows the date on which subscription charges have been applied.
Lines Subscription
This tab displays the subscription plans currently being applied to phone lines (see the field’s description above).
Transactions
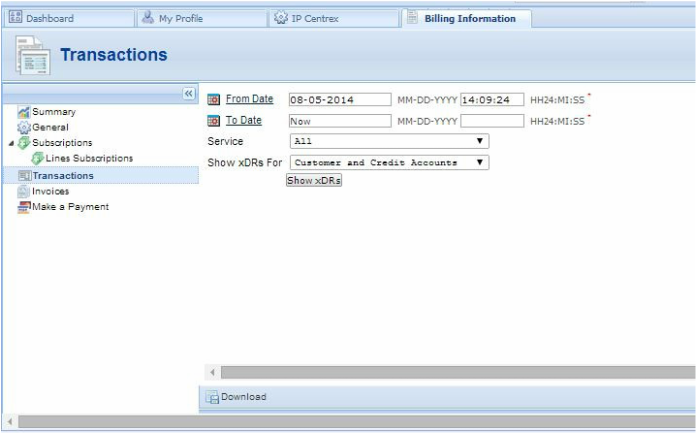
Transactions (calls, payments, refunds, subscription charges, etc.) serve as the primary record of services provided to you.
This screen allows you to view and download transaction records – xDRs (eXtensible Detail Records) for any desired time period.
This screen allows you to view and download transaction records – xDRs (eXtensible Detail Records) for any desired time period.
On the xDR view page you can make an extensible search via:
- A date and time range by clicking the Date icon
- A certain service type
- The type of required phone lines (accounts)
|
Set the ‘from / to dates’ by clicking the icon and press the Show xDRs button.
The result page contains a summary displayed at the top of the screen and tables list all calls and accompanying charges during a specified time period. If you want to view information (charged quantity and amounts due) for all of the services, |

